Pythonは機械学習の分野で人気のプログラミング言語です。機械学習プログラミングは自力で書くと大変ですが、Python機械学習ライブラリscikit-learnを使えばハードルはグッと下がります。ここではscikit-learnのインストールと例題の紹介を行います。
こんにちは。wat(@watlablog)です。近年はより一層機械学習の研究や活用が活発ですね!ここではPythonの機械学習ライブラリであるscikit-learnのインストールと例題による実行確認を行います!
機械学習プログラミングは外部のライブラリを使おう!
機械学習に外部ライブラリを使う理由
当WATLABブログでは過去に「PythonでパーセプトロンのANDゲートを実装する!」等で簡単なニューロンモデルによるANDゲートを実装してみました。
ANDゲートといっても、作成したパーセプトロンは一種の分類問題で、あるラインから上は1、下は0といった線形分類をしていました。
上記のニューロンモデルが多層に連なったり、様々なアルゴリズムが実装されていくことでディープラーニングに代表されるような学習プログラムになっていくのですが、正直真面目に1からしっかりしたコーディングをしていくためには相当な学習量が必要です。
当ブログでは、学習の理解のためにあえて既に知られているようなことも実際に自分でコーディングしてみて挙動を観察する…ということももちろんやっていきますが、実際に機械学習を使って何かやろうという場合は外部のライブラリやフレームワークを活用する方針です。
既にオープンソースで開発されているライブラリと同じものを作ったとしても、何も付加価値が付かなければ誰も活用してくれません(自分の理解力は圧倒的につくと思いますので、ポートフォリオには良いと思います)。
車輪の再発明にならないように、世間で広く検証が進められている外部ライブラリの使い方を学びましょう!
scikit-learnとは?
scikit-learnとは、Pythonの機械学習用ライブラリのことで、NumPyとSciPyを相互にやりとりするように設計されています。
scikitの語源はSciPy Toolkitで、サードパーティ製のSciPy拡張という意味が込められています。
scikit-learnには機械学習で一般に知られているアルゴリズムは大抵実装されているとのことです。以下の公式Webサイトのトップページには「分類」、「次数低減」…といったキーワードで出来ることが紹介されています。英語ページですがとても参考になるため是非確認してみて下さい。
公式ページ:scikit-learn.org
scikit-learnインストールと実行の確認
pipでインストール
Pythonの外部ライブラリインストールではもはやお馴染みですが、scikit-learnもpipでインストールすることができます。
pipコマンドは以下の通り。
|
1 |
python -m pip install scikit-learn |
scikit-learnはnumpyとscipyも使うので、まだインストールされていない方は同様にpipでインストールしておきましょう。
pipについてよくわからないという方は、「Pythonのパッケージ管理ツール pipの使い方とコマンド集」に簡単な概要を記載しましたので是非ご確認下さい。
scikit-learnの動作確認:例題の実行
pipでscikit-learnをインストールできたら、まずは動作確認を行いましょう!
動作確認には公式ページに書いてあるコードをコピペするのが最も効率が良いです。
ここではまず「分類器の比較」をしてみます。先ほどの公式ページにアクセスし、以下の画像クリックすると、「Classifier comparison」のページへ飛びます。

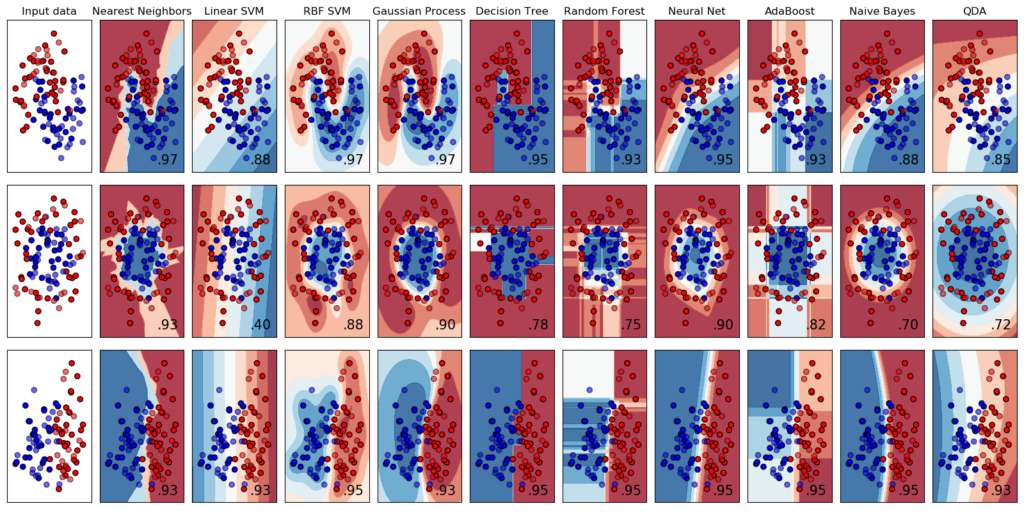
移動したページには、サポートベクターマシン、決定木、ランダムフォレスト、ニューラルネット…と同じデータセットに対して様々な分類器による分類比較を行うコードが公開されています。
以下がそのサンプルコードです。scikit-learn、numpy、scipyのインストールが成功していれば問題無く実行できると思います。
|
1 2 3 4 5 6 7 8 9 10 11 12 13 14 15 16 17 18 19 20 21 22 23 24 25 26 27 28 29 30 31 32 33 34 35 36 37 38 39 40 41 42 43 44 45 46 47 48 49 50 51 52 53 54 55 56 57 58 59 60 61 62 63 64 65 66 67 68 69 70 71 72 73 74 75 76 77 78 79 80 81 82 83 84 85 86 87 88 89 90 91 92 93 94 95 96 97 98 99 100 101 102 103 104 105 106 107 108 109 110 111 112 113 114 |
import numpy as np import matplotlib.pyplot as plt from matplotlib.colors import ListedColormap from sklearn.model_selection import train_test_split from sklearn.preprocessing import StandardScaler from sklearn.datasets import make_moons, make_circles, make_classification from sklearn.neural_network import MLPClassifier from sklearn.neighbors import KNeighborsClassifier from sklearn.svm import SVC from sklearn.gaussian_process import GaussianProcessClassifier from sklearn.gaussian_process.kernels import RBF from sklearn.tree import DecisionTreeClassifier from sklearn.ensemble import RandomForestClassifier, AdaBoostClassifier from sklearn.naive_bayes import GaussianNB from sklearn.discriminant_analysis import QuadraticDiscriminantAnalysis h = .02 # step size in the mesh names = ["Nearest Neighbors", "Linear SVM", "RBF SVM", "Gaussian Process", "Decision Tree", "Random Forest", "Neural Net", "AdaBoost", "Naive Bayes", "QDA"] classifiers = [ KNeighborsClassifier(3), SVC(kernel="linear", C=0.025), SVC(gamma=2, C=1), GaussianProcessClassifier(1.0 * RBF(1.0)), DecisionTreeClassifier(max_depth=5), RandomForestClassifier(max_depth=5, n_estimators=10, max_features=1), MLPClassifier(alpha=1, max_iter=1000), AdaBoostClassifier(), GaussianNB(), QuadraticDiscriminantAnalysis()] X, y = make_classification(n_features=2, n_redundant=0, n_informative=2, random_state=1, n_clusters_per_class=1) rng = np.random.RandomState(2) X += 2 * rng.uniform(size=X.shape) linearly_separable = (X, y) datasets = [make_moons(noise=0.3, random_state=0), make_circles(noise=0.2, factor=0.5, random_state=1), linearly_separable ] figure = plt.figure(figsize=(27, 9)) i = 1 # iterate over datasets for ds_cnt, ds in enumerate(datasets): # preprocess dataset, split into training and test part X, y = ds X = StandardScaler().fit_transform(X) X_train, X_test, y_train, y_test = \ train_test_split(X, y, test_size=.4, random_state=42) x_min, x_max = X[:, 0].min() - .5, X[:, 0].max() + .5 y_min, y_max = X[:, 1].min() - .5, X[:, 1].max() + .5 xx, yy = np.meshgrid(np.arange(x_min, x_max, h), np.arange(y_min, y_max, h)) # just plot the dataset first cm = plt.cm.RdBu cm_bright = ListedColormap(['#FF0000', '#0000FF']) ax = plt.subplot(len(datasets), len(classifiers) + 1, i) if ds_cnt == 0: ax.set_title("Input data") # Plot the training points ax.scatter(X_train[:, 0], X_train[:, 1], c=y_train, cmap=cm_bright, edgecolors='k') # Plot the testing points ax.scatter(X_test[:, 0], X_test[:, 1], c=y_test, cmap=cm_bright, alpha=0.6, edgecolors='k') ax.set_xlim(xx.min(), xx.max()) ax.set_ylim(yy.min(), yy.max()) ax.set_xticks(()) ax.set_yticks(()) i += 1 # iterate over classifiers for name, clf in zip(names, classifiers): ax = plt.subplot(len(datasets), len(classifiers) + 1, i) clf.fit(X_train, y_train) score = clf.score(X_test, y_test) # Plot the decision boundary. For that, we will assign a color to each # point in the mesh [x_min, x_max]x[y_min, y_max]. if hasattr(clf, "decision_function"): Z = clf.decision_function(np.c_[xx.ravel(), yy.ravel()]) else: Z = clf.predict_proba(np.c_[xx.ravel(), yy.ravel()])[:, 1] # Put the result into a color plot Z = Z.reshape(xx.shape) ax.contourf(xx, yy, Z, cmap=cm, alpha=.8) # Plot the training points ax.scatter(X_train[:, 0], X_train[:, 1], c=y_train, cmap=cm_bright, edgecolors='k') # Plot the testing points ax.scatter(X_test[:, 0], X_test[:, 1], c=y_test, cmap=cm_bright, edgecolors='k', alpha=0.6) ax.set_xlim(xx.min(), xx.max()) ax.set_ylim(yy.min(), yy.max()) ax.set_xticks(()) ax.set_yticks(()) if ds_cnt == 0: ax.set_title(name) ax.text(xx.max() - .3, yy.min() + .3, ('%.2f' % score).lstrip('0'), size=15, horizontalalignment='right') i += 1 plt.tight_layout() plt.show() |
以下が実行結果として得られるグラフです。縦方向左3つのinput dataに対して、右側に分類器違いの結果が列挙されています。

これでscikit-learnを使ったプログラミングの準備が整いました!
この短いコードでこんなアウトプットが得られるなんて素晴らしい!
まとめ
本記事ではPythonでscikit-learnを使った機械学習プログラムを始めるために、まずは概要の説明とインストールを行いました。
また、公式ページの例題を実行し動作確認を行うと共に、scikit-learnで出来ることの一部を確認しました。
今回は準備記事です!まだ僕自身も勉強が必要ですが、次第に機械学習系の記事も増やしていきたいと思います!
Twitterでも関連情報をつぶやいているので、wat(@watlablog)のフォローお待ちしています!

 ついにWATLABブログから書籍「いきなりプログラミングPython」が発売しました!
コメント