Pythonでセキュリティ上安全にGmailを制御するために、Gmail APIを使うのがオススメです。ここではGmail APIの導入方法とPython用ライブラリのインストール方法を説明し、メール送信方法を習得することを目標とします。
こんにちは。wat(@watlablog)です。ここではPythonを使ってGmailの送信を自動化する方法を習得します!
Gmail APIを使うと安全にプログラムからGmailを制御できる
Gmail APIとは?
API(Application Programming Interface)とは、文字通りアプリケーションとプログラミングのインターフェースで、両者をつなぐ役割をするものという意味です。
Gmail APIはGoogleが提供するGmailというメールサービスをプログラム上から簡単に扱うことができるようにするAPIということになりますね。
実はGmail APIはもっと大きな括りで言うと、Google APIの一種ということが出来ます。
僕達が普段何気なく利用しているものも、実はGoogle製のサービスというくらい、Googleには様々なサービスがあります。
そしてそれらGoogleサービスはほとんどがAPIでプログラムから制御できるようになっています。
Gmail APIを使う意味
GmailはWebブラウザから閲覧することができるので、APIでなくても使う方法がいくつかあるそうです(試してはいませんが)。
例えばSMTPやパスワードを使ってメールを制御したり、Selenium等のWebスクレイピング技術を応用して自分のアカウントを開いたり…。
但し、いずれの場合もプログラムコード上に自分のGoogleアカウントの情報を何の暗号化も無しに載せることになりそうでかなり不安です。
Gmail APIを使えばコード上に重要な個人情報を記載することなく、Googleの許可のもとにメールサービスをプログラムから利用可能になります。
Gmail APIを利用するためには、APIを自分のGoogleアカウントで有効化しなければなりません。以下より具体的にGmail APIを使うための手順を紹介します。
Gmail APIを使う準備をする
Gmail APIを有効化する
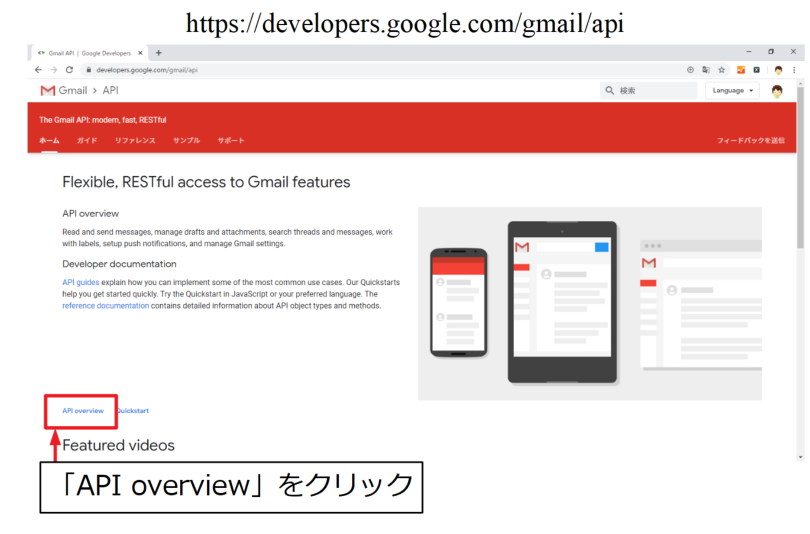
Gmail APIを有効化するために、まずは以下のURLへアクセスします。
※但し、この時点でGoogleアカウントにログインしておきます。
https://developers.google.com/gmail/api
次に、API overviewのページを開きます。
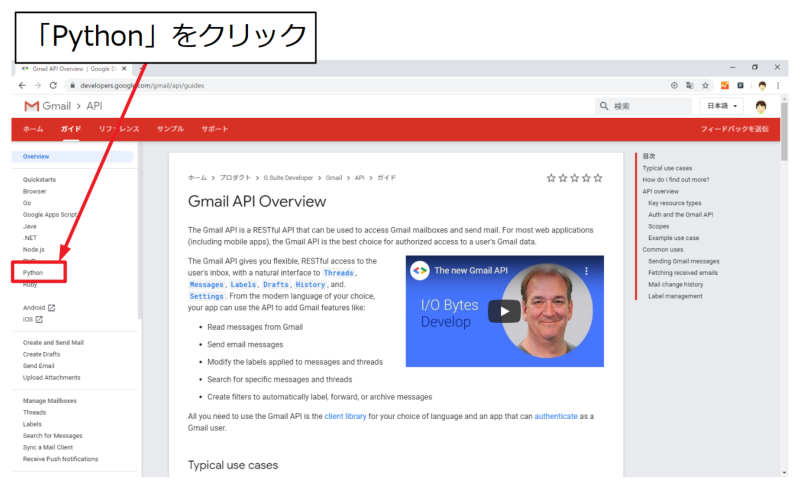
様々な言語を選ぶことができますが、ここではPythonを選択します。
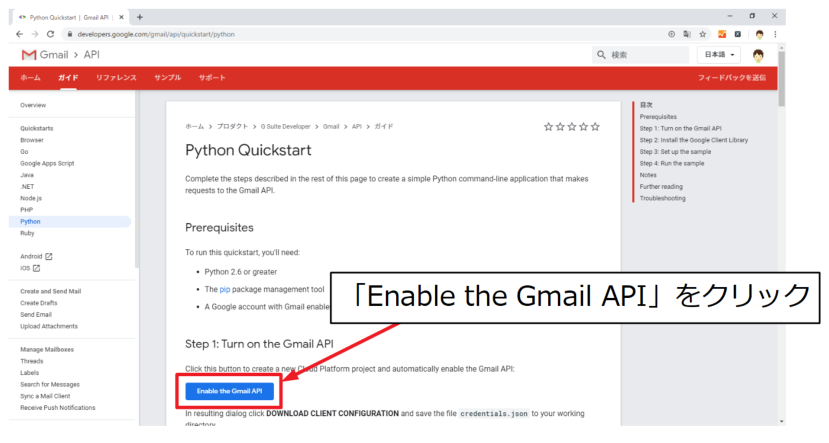
開いた先のページでEnable the Gmail APIをクリックします。
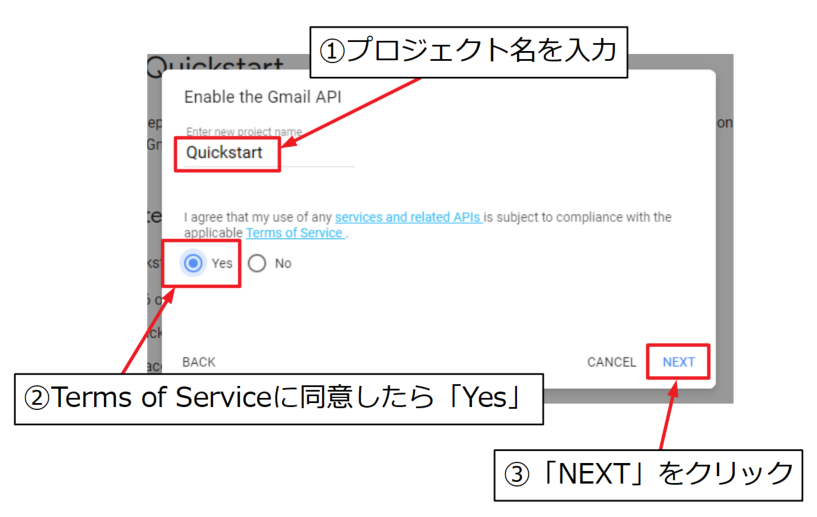
以下のウィンドウが出て来ますが、まず始めに①プロジェクト名(任意の名前)を入力し、Terms of Serviceを読み内容に同意したら②Yesを選択してから③Nextをクリックします。
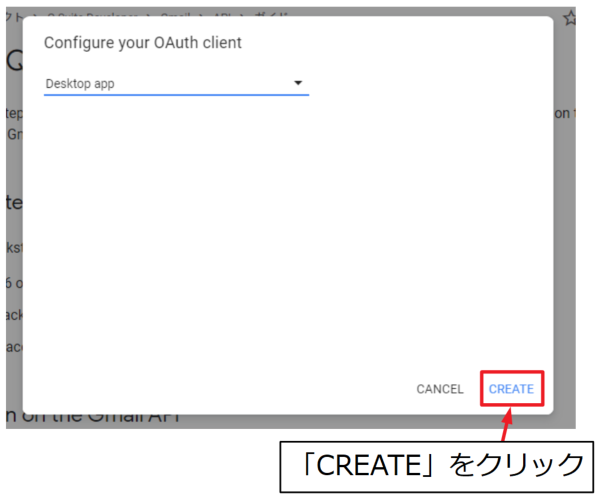
Configure your OAuth clientで認証を行う環境を選択します。プルダウンメニューからWeb系をはじめ色々と選択肢がありますが、今回はPythonファイルをPCで実行するだけなので、desktop appのままにします。
選択が終了したらCREATEをクリックします。
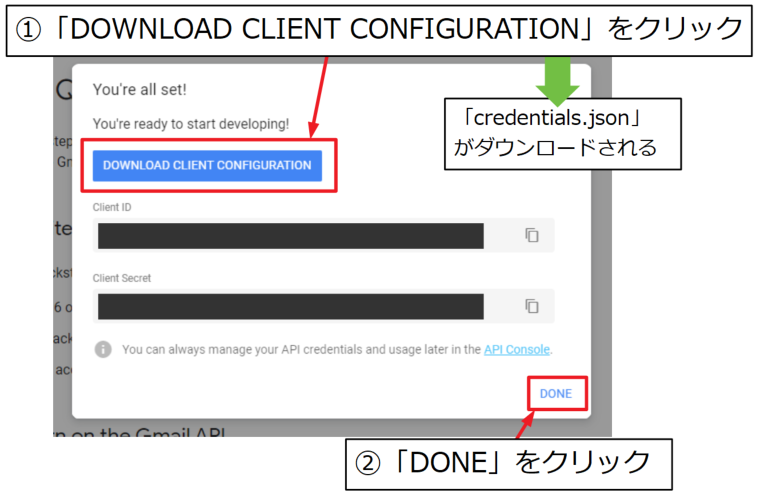
次に①DOWNLOAD CLIENT CONFIGURATIONをクリックすると、credentials.jsonというJsonファイルがダウンロードされます。ダウンロードが終了したら②DONEをクリックしてウィンドウを閉じます。
credentials.jsonについて
credentialsとは、日本語で資格情報という意味です。このファイルは自分のアカウントの資格情報が記載されているので、他者には見せないように注意しましょう。
Pythonライブラリをインストールする
公式ページにも記載がありますが、Pythonで使うライブラリをpipインストールします。
以下のコードをWindowsであればコマンドプロンプトに打ち込んで実行することでインストール可能です。
|
1 |
python -m pip install --upgrade google-api-python-client google-auth-httplib2 google-auth-oauthlib |
PythonでGmailを使うコード
公式のサンプル(ラベル取得)を実行し動作確認をする
いきなりコードをゼロから使い始めるのは難易度が高いので、まずは公式ページに載っているサンプルプログラム(Quickstart)を使って動作確認をしてみましょう。
まずはじめに先ほどダウンロードしたcredentials.jsonをプログラムを実行する.pyファイルと同じ所に置きます。
次に、以下のコードを使ってプログラムを実行します。
|
1 2 3 4 5 6 7 8 9 10 11 12 13 14 15 16 17 18 19 20 21 22 23 24 25 26 27 28 29 30 31 32 33 34 35 36 37 38 39 40 41 42 43 44 45 |
from __future__ import print_function import pickle import os.path from googleapiclient.discovery import build from google_auth_oauthlib.flow import InstalledAppFlow from google.auth.transport.requests import Request # If modifying these scopes, delete the file token.pickle. SCOPES = ['https://www.googleapis.com/auth/gmail.readonly'] def main(): creds = None # The file token.pickle stores the user's access and refresh tokens, and is # created automatically when the authorization flow completes for the first # time. if os.path.exists('token.pickle'): with open('token.pickle', 'rb') as token: creds = pickle.load(token) # If there are no (valid) credentials available, let the user log in. if not creds or not creds.valid: if creds and creds.expired and creds.refresh_token: creds.refresh(Request()) else: flow = InstalledAppFlow.from_client_secrets_file( 'credentials.json', SCOPES) creds = flow.run_local_server(port=0) # Save the credentials for the next run with open('token.pickle', 'wb') as token: pickle.dump(creds, token) service = build('gmail', 'v1', credentials=creds) # Call the Gmail API results = service.users().labels().list(userId='me').execute() labels = results.get('labels', []) if not labels: print('No labels found.') else: print('Labels:') for label in labels: print(label['name']) if __name__ == '__main__': main() |
エラー?→許可が必要なだけでした
プログラムを実行すると、以下のように「このアプリは確認されていません」というメッセージが出て思うように動かないと思います。
※こちらはGoogle Chromeをデフォルトブラウザに設定しているため、プログラムを実行したらChromeの画面が開きました。
どうやら許可を与えなければいけないようなので、表示されたページの下の方にある①詳細を開き、一番下に現れる②リンクを開きます。
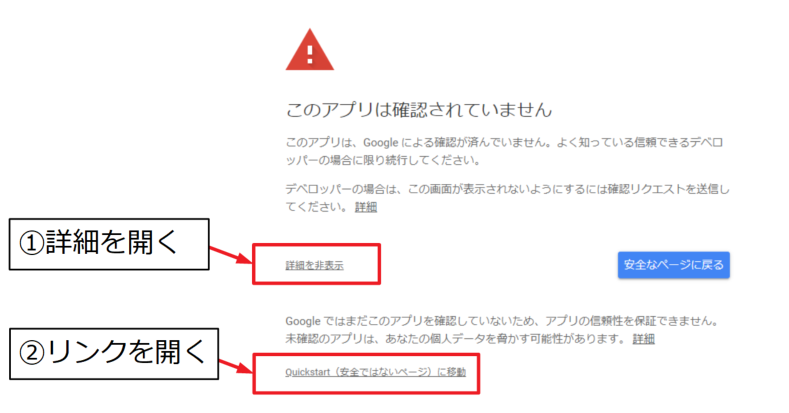
Googleアカウントを選択すると権限の付与というウィンドウが出て来ますので、これらを全て許可します。
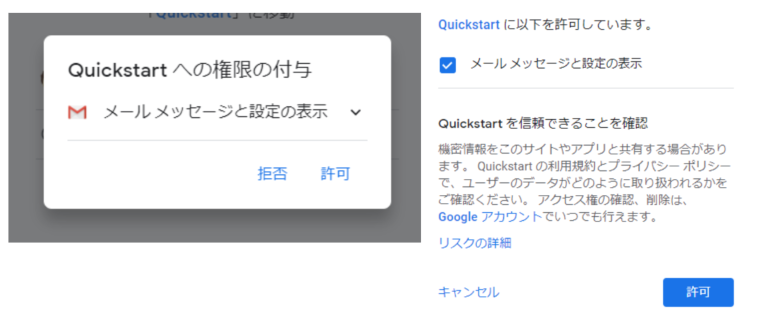
サンプルコードの実行結果
気を取り直して、再度プログラムを実行すると以下の結果を得ます。
このサンプルプログラムはmain()関数の下の方で「service.users().labels().list(userId='me').execute()」を実行し、「results.get('labels', [])」でGmailの左側ツリーにある受信ボックスや送信ボックスのラベルをリストで取得しているようです。
|
1 2 3 4 5 6 7 8 9 10 11 12 13 14 15 16 17 18 19 |
Labels: CHAT SENT INBOX IMPORTANT TRASH DRAFT SPAM CATEGORY_FORUMS CATEGORY_UPDATES CATEGORY_PERSONAL CATEGORY_PROMOTIONS CATEGORY_SOCIAL STARRED UNREAD プライベート 仕事 領収書 Notes |
main()関数の上の方は認証関係のコードのようで、これは他の操作をする時に参考になりそうですね。
Gmailでメールを送信するコードを書いていく
新しい操作を行うために、上記のサンプルコードをいじりながらメールの送信を行っていきます。
作っていきましょう…とは言っても、公式には既に送信の場合のサンプルコード(送信部のみのdef関数)もありました。なので、基本は以下のページの公式のPythonコードをコピペします。
公式サンプル(送信):https://developers.google.com/gmail/api/guides/sending
しかし、単純なコピペだけでは動かなかったので修正部分を解説していきます。
書いていない所だったり、文法がおかしい所(エラーになる所)を修正して動くようにしてみました。
import文を追加する
公式のサンプルコードを使うためには、以下のライブラリを最初に紹介したコードに追加でimportします。
|
1 2 3 |
from email.mime.text import MIMEText import base64 from apiclient import errors |
SCOPEの設定を変える
Gmail APIを使った送信のサンプルコードにはmain()の修正に関して記述がありませんが、始めに、SCOPEを変更します。
SCOPEとは、アプリの認証を行うためにユーザに要求する権限です。
以下の公式ページにSCOPEの使い方が書いてあるので、これを参考にします。
SCOPE:https://developers.google.com/gmail/api/auth/scopes?hl=ja
「Send messages only.」と書いてある「~.send」を選択して以下のように元コードを変更しました。
|
1 |
SCOPES = ['https://www.googleapis.com/auth/gmail.send'] # メール送信を使う時のスコープ |
SCOPEの設定にはフルアクセス系の要求もありますが、先ほどの公式ページに書いてあるように、「可能な限り絞り込んだスコープを選択し、アプリが実際に使わないスコープを要求しないようにする」ことが良いようです。
create_message関数を修正する
次に公式ページに載っているcreate_messageというdef関数をコピペします。この関数は送信する前のメールの中身を作成する関数です。
しかし、そのままでは以下のエラーが発生してしまいました。
「TypeError: Object of type bytes is not JSON serializable」
どうやら作ったmessageというオブジェクトのタイプが違うようで、以下のコードの最終行でreturnしている変数に.decode()を追加することでエラーが解消しました。
|
1 2 3 4 5 6 7 8 9 10 11 12 13 14 15 16 17 18 |
def create_message(sender, to, subject, message_text): """Create a message for an email. Args: sender: Email address of the sender. to: Email address of the receiver. subject: The subject of the email message. message_text: The text of the email message. Returns: An object containing a base64url encoded email object. """ message = MIMEText(message_text) message['to'] = to message['from'] = sender message['subject'] = subject return {'raw': base64.urlsafe_b64encode(message.as_bytes()).decode()} |
send_message関数を修正する
次は公式からsend_message関数をコピペします。この関数は実際にメールを送信する部分です。
ここはprint文の書き方と最後のexceptの文法がおかしかったので、その部分のみ修正しました(公式の元コードと比べて頂ければと思います(公式は旧式?))。
|
1 2 3 4 5 6 7 8 9 10 11 12 13 14 15 16 17 18 19 |
def send_message(service, user_id, message): """Send an email message. Args: service: Authorized Gmail API service instance. user_id: User's email address. The special value "me" can be used to indicate the authenticated user. message: Message to be sent. Returns: Sent Message. """ try: message = (service.users().messages().send(userId=user_id, body=message) .execute()) print('Message Id: %s' % message['id']) return message except errors.HttpError as error: print('An error occurred: %s' % error) |
tryとexceptによる例外処理は「Python小技!whileループ中のキー操作を受け付ける方法」でやって以来使っていませんでしたね。懐かしい。
mail()関数を送信用に修正する
前半で紹介したラベルを取得するコードのmain()関数はほぼそのまま使いますが、「# Call the Gmail API」の部分をメール送信の内容に変更します。
以下のコードは既に紹介したcreate_message関数に渡す引数として、送信元のアドレスsender、送信先のアドレスto、タイトルsubject、本文message_textを設定し、mailを作成、send_message関数で実際に送信する内容を意味しています。
|
1 2 3 4 5 6 7 |
# Call the Gmail API sender = 'my-address@gmail.com' to = 'my-address@gmail.com' subject = 'Test Mail from Python.' message_text = 'Hello Gmail API!' mail = create_message(sender, to, subject, message_text) send_message(service, 'me', mail) |
ここでは自分のアドレスから自分のアドレスにメールを送信しています。
全コード
以下にコピペ用の全コードを示します。ほとんどコピペなので詳細コメント等は書いていません。
|
1 2 3 4 5 6 7 8 9 10 11 12 13 14 15 16 17 18 19 20 21 22 23 24 25 26 27 28 29 30 31 32 33 34 35 36 37 38 39 40 41 42 43 44 45 46 47 48 49 50 51 52 53 54 55 56 57 58 59 60 61 62 63 64 65 66 67 68 69 70 71 72 73 74 75 76 77 78 79 80 81 82 83 84 |
from __future__ import print_function import pickle import os.path from googleapiclient.discovery import build from google_auth_oauthlib.flow import InstalledAppFlow from google.auth.transport.requests import Request from email.mime.text import MIMEText import base64 from apiclient import errors # If modifying these scopes, delete the file token.pickle. SCOPES = ['https://www.googleapis.com/auth/gmail.send'] # メール送信を使う時のスコープ def create_message(sender, to, subject, message_text): """Create a message for an email. Args: sender: Email address of the sender. to: Email address of the receiver. subject: The subject of the email message. message_text: The text of the email message. Returns: An object containing a base64url encoded email object. """ message = MIMEText(message_text) message['to'] = to message['from'] = sender message['subject'] = subject return {'raw': base64.urlsafe_b64encode(message.as_bytes()).decode()} def send_message(service, user_id, message): """Send an email message. Args: service: Authorized Gmail API service instance. user_id: User's email address. The special value "me" can be used to indicate the authenticated user. message: Message to be sent. Returns: Sent Message. """ try: message = (service.users().messages().send(userId=user_id, body=message) .execute()) print('Message Id: %s' % message['id']) return message except errors.HttpError as error: print('An error occurred: %s' % error) def main(): creds = None # The file token.pickle stores the user's access and refresh tokens, and is # created automatically when the authorization flow completes for the first # time. if os.path.exists('token.pickle'): with open('token.pickle', 'rb') as token: creds = pickle.load(token) # If there are no (valid) credentials available, let the user log in. if not creds or not creds.valid: if creds and creds.expired and creds.refresh_token: creds.refresh(Request()) else: flow = InstalledAppFlow.from_client_secrets_file( 'credentials.json', SCOPES) creds = flow.run_local_server(port=0) # Save the credentials for the next run with open('token.pickle', 'wb') as token: pickle.dump(creds, token) service = build('gmail', 'v1', credentials=creds) # Call the Gmail API sender = 'my-address@gmail.com' to = 'my-address@gmail.com' subject = 'Test Mail from Python.' message_text = 'Hello Gmail API!' mail = create_message(sender, to, subject, message_text) send_message(service, 'me', mail) if __name__ == '__main__': main() |
再度認証エラーでハマってしまった場合→token.pickleが原因でした
最終的には上記コードでうまくいくのですが、以下のエラーメッセージが出る場合があります。先ほどはAPIを使った新しい操作を行う時に、Webブラウザが立ち上がって操作を「許可」するアクションがありましたが、このメッセージが出る場合はWebブラウザも立ち上がりません。
「HttpError 403 when requesting https://www.googleapis.com/gmail/v1/users/me/messages/send?alt=json returned "Insufficient Permission"」
結果的には、.pyファイルと同じ階層に作られるtoken.pickleを一度削除してからコードを実行することで解決しました。
pickleは「Python機械学習済モデルをpickleで保存して復元する方法」で一度使った事がありましたが、Python標準ライブラリの1つで、オブジェクトの状態をファイルに保存することができます。
そのため、先ほどラベルの取得コードに限定して得た認証がそのまま残り、今回のメール送信操作に対しての認証が無かったためにエラーとなったと推定できます。
エラー内容を検索しても全然ヒットせず、僕はこの部分にかなりハマりました!
本記事が誰かの解決ページになることを祈り上記内容を記録しておきます!
token.pickleを削除してからコードを実行すると、新たに認証のページが開かれます。先ほどと同様に一度許可してしまえば今後は同一のプロジェクトで聞かれることはなくなります。
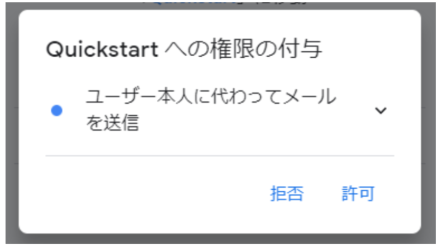
実行結果
以下が上記コードを実行して実際に自分のアドレスで受信した結果です。
どうやらGoogleさんはプログラム的に送信されたメールを見分けて警告文を出してくれるようです。
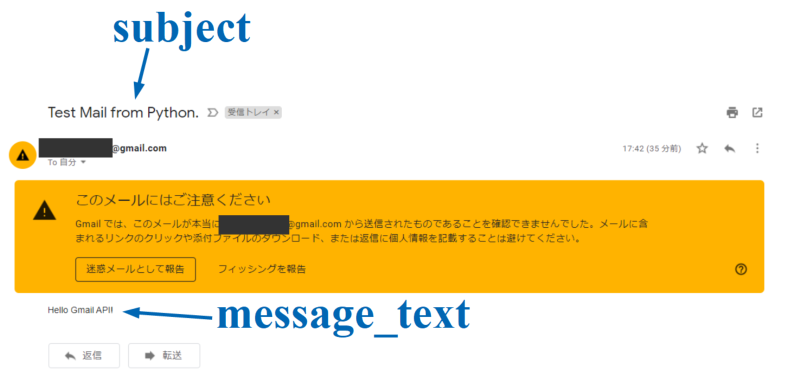
メールがPythonから送信できたということで、まずは目標達成としましょう。
API reference
以下に参考までに公式リファレンスのリンクを載せます。
Reference:https://developers.google.com/gmail/api/v1/reference/
SCOPE:https://developers.google.com/gmail/api/auth/scopes?hl=ja
まとめ
本記事ではGmail APIを使ってPythonからGmailを制御する方法を学びました。
公式ページではサンプルのコードが豊富にあり、特に大枠のコーディングで困る所はありませんでしたが、ちょっとしたエラーや文法違いを修正する所で時間をとられてしまいました。
GoogleのAPIは様々な機能に「許可」を与えることが必要で、資格情報を意味するcredentials.jsonファイルや状態を記録するtoken.pickleに気を付ける必要がありました。
最終的には修正したサンプルコードでGmailからメールを送信することが出来ました。
APIは正直覚えることが多くあって面倒ですが、なんとかメールを操作できました!Twitterでも関連情報をつぶやいているので、wat(@watlablog)のフォローお待ちしています!

 ついにWATLABブログから書籍「いきなりプログラミングPython」が発売しました!
コメント